[Home] [Downloads] [Search] [Help/forum]


Register forum user name Search FAQ

Gammon Forum

[Folder]  Entire forum
-> [Folder]  Electronics
. -> [Folder]  Microprocessors
. . -> [Subject]  SPI - Serial Peripheral Interface - for Arduino

SPI - Serial Peripheral Interface - for Arduino

Postings by administrators only.

[Refresh] Refresh page


Posted by Nick Gammon   Australia  (22,975 posts)  [Biography] bio   Forum Administrator
Date Tue 25 Jan 2011 03:37 AM (UTC)

Amended on Thu 21 May 2015 07:46 PM (UTC) by Nick Gammon

Message
This page can be quickly reached from the link: http://www.gammon.com.au/spi


This post describes how the SPI interface works, with particular reference to the Arduino Uno which is based on the ATmega328P microprocessor chip. A lot of the details however will be of more general interest.

SPI is used to send serial data from a microprocessor to another one, or a peripheral, for example an LCD display, a temperature sensor, a memory (SD) chip, and so on.

More information about SPI at:

http://en.wikipedia.org/wiki/Serial_Peripheral_Interface_Bus

More information about the Arduino SPI interface at:

http://arduino.cc/en/Reference/SPI

Other protocols


Sending data


Let's start with an image - this is a screenshot taken with a logic analyser. It shows the 3-character sequence "Fab" being sent from the Arduino.


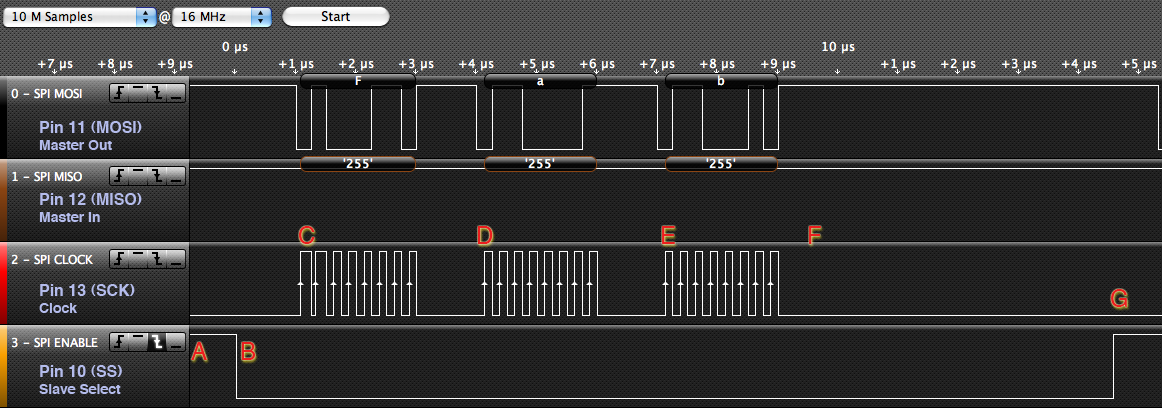
I put a trigger on the SS (Slave Select) pin so that the logic analyser would start analysing from when the sequence started.

From the above graphic note the following points of interest:


  • A - no data (SS is high, clock is low)

  • B - SS taken low to enable the slave (peripheral). At this point the slave should prepare to transfer data by setting the MOSI (master out, slave in) line, and the SCK (serial clock) as inputs, and the MISO (master in, slave out) as an output. The slave can now prepare to notice clock pulses on the SCK line.

  • C - First character arrives (the letter "F" or 0x46 or 0b01000110). For each of the 8 bits the SCK (clock) line is briefly brought high, and then low again. This tells the slave to read the data on the MOSI line. Also the slave can place data on the MISO line for the master to simultaneously read in.

  • D - The letter "a" arrives

  • E - The letter "b" arrives

  • F - "No data" after "Fab" - however the SS is still enabled.

  • G - SS taken high to indicate end of the sequence of data. At this stage the slave should release the MISO line (configure it as an input, or "high impedance"). Also the slave should ignore any clock pulses now (they may be for a different peripheral).


The code to produce this (in Arduino's C++ language) was:


// Written by Nick Gammon
// January 2011

#include <SPI.h>

void setup (void)
{
}


void loop (void)
{

  
  digitalWrite(SS, HIGH);  // ensure SS stays high

  // Put SCK, MOSI, SS pins into output mode
  // also put SCK, MOSI into LOW state, and SS into HIGH state.
  // Then put SPI hardware into Master mode and turn SPI on
  SPI.begin ();

  delay (5000);  // 5 seconds delay to start logic analyser.

  char c;
  
  // enable Slave Select
  digitalWrite(SS, LOW);    // SS is pin 10
  
  // send test string
  for (const char * p = "Fab" ; c = *p; p++)
    SPI.transfer (c);

 // disable Slave Select
 digitalWrite(SS, HIGH);

 // turn SPI hardware off
 SPI.end ();
 
 while (1);  //loop
}


More detail for the first character (the letter "F" or 0x46 or 0b01000110) can be seen here:


Notice how for each bit (starting with the most significant bit) the MOSI line is first changed to the correct state (0 or 1) and then the SCK (clock) line is pulsed to indicate that the data should be read.

Sending and receiving data


The next graphic, taken while sending data to an Ethernet card, shows how both MOSI and MISO lines can be exchanging data simultaneously:


Basically, while the master hardware is clocking out bits on the MOSI line (master out, slave in) it is also clocking in bits on the MISO (master in, slave out). Effectively, during one character time, it both sends and receives one byte. Hence the name of the function SPI.transfer.

The code that produced the above might have looked like:


char a, b;

a = SPI.transfer (4);

// a is now 1

b = SPI.transfer (3);

// b is now 2


Timing


As you can see from the Logic analyser timing, each byte seems to take about 3 microseconds to be sent, so that means you could send 333,333 bytes in one second, effectively being 325.5 Kbytes/s (333333/1024).

The clock pulses are 0.25 microseconds apart (0.125 microseconds on and 0.125 microseconds off). Effectively this means it is clocking at 4 MHz.

[EDIT] However see below ("SPI speeds") for a more detailed analysis. In particular, rates of 888,888 bytes per second are theoretically achievable (868 Kbytes/s). Also you can slow SPI down if the receiving end operates more slowly or needs time to process the data.


Slave Select


There is a bit of confusion about the Slave Select pin. This is because the SPI hardware can be used to communicate with a number of slaves at once. The way this is done is to tie the SCK, MISO and MISO lines together (for each slave) and have a separate SS (slave select) line for each slave. This way you only need 3 wires (plus ground) in total, plus one slave select for each slave.

Thus, slaves should let each of the lines float (as inputs) unless their slave select is taken low. Then, and only then, should they configure their MISO line (master in, slave out) to be an output, so they can send data back to the master.

Pin 10 of the Arduino is the SS line - so does this mean you have to use it for the peripheral SS line? Or should it be kept high? The answer (from the Atmega documentation) is that the SS line (pin 10) must be configured as an output (regardless of what value is on it). If configured as an output the Arduino ignores the value on that line, and thus the SPI hardware will not be put into slave mode.

Since the value on pin 10 is ignored, providing it is set as an output, then it can also be used as the SS line for your first, or only, slave. You could then use other pins (eg. 5, 6, 7, 8, 9) to control other slaves.

Protocols


The SPI spec does not specify protocols as such, so it is up to individual master/slave pairings to agree on what the data means. Whilst you can send and receive bytes simultaneously, the received byte cannot be a direct response to the sent byte (as they are being assembled simultaneously). For example, in the graphic above, the slave is not replying with a 1 to the transfer of 4, because it doesn't know it has received 4 before it has already sent 1.

So it would be more logical for one end to send a request (eg. 4 might mean "list the disk directory") and then do transfers (perhaps just sending zeros outwards) until it receives a complete response. The response might terminate with a newline, or 0x00 character.

You also don't necessarily know if you even have a peripheral attached. One way might be to send out a "query", like this:


SPI.transfer (0xCD);  // are you there?
byte x = SPI.transfer (0); // get response

if (x == 0xEF)
  {
    // peripheral is alive
  }


This example asks the slave to reply with 0xEF if it receives 0xCD - this presumably wouldn't happen if the wires were not connected to anything. This could be used to verify that the slave actually was there and "alive".


Modes


For maximum flexibility with various slaves, the SPI protocol allows for variations on the polarity of the clock pulses. CPOL is clock polarity, and CPHA is clock phase.


  • Mode 0 (the default) - clock is normally low (CPOL = 0), and the data is sampled on the transition from low to high (leading edge) (CPHA = 0)

  • Mode 1 - clock is normally low (CPOL = 0), and the data is sampled on the transition from high to low (trailing edge) (CPHA = 1)

  • Mode 2 - clock is normally high (CPOL = 1), and the data is sampled on the transition from high to low (leading edge) (CPHA = 0)

  • Mode 3 - clock is normally high (CPOL = 1), and the data is sampled on the transition from low to high (trailing edge) (CPHA = 1)


Mode 0


Mode 1


Mode 2


Mode 3


Example code to change mode:


  SPI.setDataMode (SPI_MODE3);


There is also a DORD (data order) flag. The normal order is most significant bit first (as above) but the alternate order is least significant bit first.

Arduino Library


The Arduino development kit comes with an SPI library. To use it you just need to include it, like this:


#include <SPI.h>


This gives you an SPIClass, and an instance of that class called SPI in SPI.cpp.

To condition the hardware you call SPI.begin () which configures the SPI pins (SCK, MOSI, SS) as outputs. It sets SCK and MOSI low, and SS high. It then enables SPI mode with the hardware in "master" mode. This has the side-effect of setting MISO as an input.

If you need to change the mode or bit order you have the functions SPI.setDataMode and SPI.setBitOrder. Normally you wouldn't have to.

The function SPI.transfer does the actual transferring of bytes. It is up to you to set SS low at an appropriate time (this may or may not be pin 10 as described above). When finished call SPI.end () to turn the hardware SPI off.

Pinouts on the Arduino Uno


Pinouts on the Arduino Mega2560


On the Arduino Mega, the pins are 50 (MISO), 51 (MOSI), 52 (SCK), and 53 (SS).

Pinouts using the ICSP header


You can also connect to the SPI pins (except SS) by using the ICSP header (on both the Uno and the Mega2560):


[EDIT] Modified 8th July 2012 to add screenshots of logic analyzer output of the various clock modes.

- Nick Gammon

www.gammon.com.au, www.mushclient.com
[Go to top] top

Posted by Nick Gammon   Australia  (22,975 posts)  [Biography] bio   Forum Administrator
Date Reply #1 on Sun 13 Feb 2011 08:21 PM (UTC)

Amended on Sun 04 Dec 2016 04:02 AM (UTC) by Nick Gammon

Message
How to make an SPI slave


The earlier example shows the Arduino as the master, sending data to a slave device. This example shows how the Arduino can be a slave.

Hardware setup

Connect two Arduinos together with the following pins connected to each other:


  • 10 (SS)
  • 11 (MOSI)
  • 12 (MISO)
  • 13 (SCK)

  • +5v (if required)
  • GND (for signal return)


On the Arduino Mega, the pins are 50 (MISO), 51 (MOSI), 52 (SCK), and 53 (SS).

In any case, MOSI at one end is connected to MOSI at the other, you don't swap them around (that is you do not have MOSI <-> MISO). The software configures one end of MOSI (master end) as an output, and the other end (slave end) as an input.


Master (example)


// Written by Nick Gammon
// February 2011


#include <SPI.h>

void setup (void)
{

  digitalWrite(SS, HIGH);  // ensure SS stays high for now

  // Put SCK, MOSI, SS pins into output mode
  // also put SCK, MOSI into LOW state, and SS into HIGH state.
  // Then put SPI hardware into Master mode and turn SPI on
  SPI.begin ();

  // Slow down the master a bit
  SPI.setClockDivider(SPI_CLOCK_DIV8);
  
}  // end of setup


void loop (void)
{

  char c;

  // enable Slave Select
  digitalWrite(SS, LOW);    // SS is pin 10

  // send test string
  for (const char * p = "Hello, world!\n" ; c = *p; p++)
    SPI.transfer (c);

  // disable Slave Select
  digitalWrite(SS, HIGH);

  delay (1000);  // 1 seconds delay 
}  // end of loop


This sends "Hello, world" every second to the slave.

Slave


// Written by Nick Gammon
// February 2011


#include <SPI.h>

char buf [100];
volatile byte pos;
volatile boolean process_it;

void setup (void)
{
  Serial.begin (115200);   // debugging
  
  // turn on SPI in slave mode
  SPCR |= bit (SPE);

  // have to send on master in, *slave out*
  pinMode(MISO, OUTPUT);
  
  // get ready for an interrupt 
  pos = 0;   // buffer empty
  process_it = false;

  // now turn on interrupts
  SPI.attachInterrupt();

}  // end of setup


// SPI interrupt routine
ISR (SPI_STC_vect)
{
byte c = SPDR;  // grab byte from SPI Data Register
  
  // add to buffer if room
  if (pos < (sizeof (buf) - 1))
    buf [pos++] = c;
    
  // example: newline means time to process buffer
  if (c == '\n')
    process_it = true;
      
}  // end of interrupt routine SPI_STC_vect

// main loop - wait for flag set in interrupt routine
void loop (void)
{
  if (process_it)
    {
    buf [pos] = 0;  
    Serial.println (buf);
    pos = 0;
    process_it = false;
    }  // end of flag set
    
}  // end of loop


The slave is entirely interrupt-driven, thus it can doing other stuff. The incoming SPI data is collected in a buffer, and a flag set when a "significant byte" (in this case a newline) arrives. This tells the slave to get on and start processing the data.

Example of connecting master to slave using SPI


[EDIT] Modified 25 June 2012 to allow for version 1.0 of the Arduino IDE.

[EDIT] Modified 8th July 2012 to add photo of connecting SPI master and slave.

- Nick Gammon

www.gammon.com.au, www.mushclient.com
[Go to top] top

Posted by Nick Gammon   Australia  (22,975 posts)  [Biography] bio   Forum Administrator
Date Reply #2 on Thu 07 Apr 2011 11:44 PM (UTC)

Amended on Mon 24 Aug 2015 08:39 PM (UTC) by Nick Gammon

Message
How to get a response from a slave


Following on from the code above which sends data from an SPI master to a slave, the example below shows sending data to a slave, having it do something with it, and return a response.

The master is similar to the example above. However an important point is that we need to add a slight delay (something like 20 microseconds). Otherwise the slave doesn't have a chance to react to the incoming data and do something with it.

The example shows sending a "command". In this case "a" (add something) or "s" (subtract something). This is to show that the slave is actually doing something with the data.

After dropping slave-select (SS) to initiate the transaction, the master sends the command, followed by any number of bytes, and then raises SS to terminate the transaction.

A very important point is that the slave cannot respond to an incoming byte at the same moment. The response has to be in the next byte. This is because the bits which are being sent, and the bits which are being received, are being sent simultaneously. Thus to add something to four numbers we need five transfers, like this:


 transferAndWait (10);
  a = transferAndWait (17);
  b = transferAndWait (33);
  c = transferAndWait (42);
  d = transferAndWait (0);


First we request action on number 10. But we don't get a response until the next transfer (the one for 17). However "a" will be set to the reply to 10. Finally we end up sending a "dummy" number 0, to get the reply for 42.

Master (example)


// Written by Nick Gammon
// April 2011


#include <SPI.h>

void setup (void)
{
  Serial.begin (115200);
  Serial.println ();
  
  digitalWrite(SS, HIGH);  // ensure SS stays high for now

  // Put SCK, MOSI, SS pins into output mode
  // also put SCK, MOSI into LOW state, and SS into HIGH state.
  // Then put SPI hardware into Master mode and turn SPI on
  SPI.begin ();

  // Slow down the master a bit
  SPI.setClockDivider(SPI_CLOCK_DIV8);
  
}  // end of setup

byte transferAndWait (const byte what)
{
  byte a = SPI.transfer (what);
  delayMicroseconds (20);
  return a;
} // end of transferAndWait

void loop (void)
{

  byte a, b, c, d;
  
  // enable Slave Select
  digitalWrite(SS, LOW);    

  transferAndWait ('a');  // add command
  transferAndWait (10);
  a = transferAndWait (17);
  b = transferAndWait (33);
  c = transferAndWait (42);
  d = transferAndWait (0);

  // disable Slave Select
  digitalWrite(SS, HIGH);

  Serial.println ("Adding results:");
  Serial.println (a, DEC);
  Serial.println (b, DEC);
  Serial.println (c, DEC);
  Serial.println (d, DEC);
  
  // enable Slave Select
  digitalWrite(SS, LOW);   

  transferAndWait ('s');  // subtract command
  transferAndWait (10);
  a = transferAndWait (17);
  b = transferAndWait (33);
  c = transferAndWait (42);
  d = transferAndWait (0);

  // disable Slave Select
  digitalWrite(SS, HIGH);

  Serial.println ("Subtracting results:");
  Serial.println (a, DEC);
  Serial.println (b, DEC);
  Serial.println (c, DEC);
  Serial.println (d, DEC);
  
  delay (1000);  // 1 second delay 
}  // end of loop


The code for the slave basically does almost everything in the interrupt routine (called when incoming SPI data arrives). It takes the incoming byte, and adds or subtracts as per the remembered "command byte". Note that the response will be "collected" next time through the loop. This is why the master has to send one final "dummy" transfer to get the final reply.

In my example I am using the main loop to simply detect when SS goes high, and clear the saved command. That way, when SS is pulled low again for the next transaction, the first byte is considered the command byte.

More reliably, this would be done with an interrupt. That is, you would physically connect SS to one of the interrupt inputs (eg, on the Uno, connect pin 10 (SS) to pin 2 (an interrupt input).

Then the interrupt could be used to notice when SS is being pulled low or high. (See further down for an example).

Slave (example)


// Written by Nick Gammon
// April 2011

// what to do with incoming data
volatile byte command = 0;

void setup (void)
{

  // have to send on master in, *slave out*
  pinMode(MISO, OUTPUT);

  // turn on SPI in slave mode
  SPCR |= _BV(SPE);

  // turn on interrupts
  SPCR |= _BV(SPIE);

}  // end of setup


// SPI interrupt routine
ISR (SPI_STC_vect)
{
  byte c = SPDR;
 
  switch (command)
  {
  // no command? then this is the command
  case 0:
    command = c;
    SPDR = 0;
    break;
    
  // add to incoming byte, return result
  case 'a':
    SPDR = c + 15;  // add 15
    break;
    
  // subtract from incoming byte, return result
  case 's':
    SPDR = c - 8;  // subtract 8
    break;

  } // end of switch

}  // end of interrupt service routine (ISR) SPI_STC_vect

void loop (void)
{
  
  // if SPI not active, clear current command
  if (digitalRead (SS) == HIGH)
    command = 0;
}  // end of loop


Example output:


Adding results:
25
32
48
57
Subtracting results:
2
9
25
34
Adding results:
25
32
48
57
Subtracting results:
2
9
25
34


This logic analyzer screenshot shows the timing involved:


  • The number 10 is sent down during an early SPI.transfer.

  • The ISR (interrupt service routine) kicks in, and processes the number (adding 15) and putting the result back into SPDR (SPI Data Register)

  • During the subsequent SPI.transfer (when the next number is sent down) the result (25) is returned back to the master.


Slave (example) using interrupt for SS pin


This slightly modified version of the slave sketch shows how you can detect SS being brought low with an interrupt, this would be more reliable than testing for it in the main loop.

Note that to do this you connect together the SS pin (pin 10 on the Uno, pin 53 on the Mega) to pin 2. You could choose other interrupt-configurable pins if you wanted to. Pin 2 is interrupt number 0, hence the attachInterrupt for interrupt 0.


// Written by Nick Gammon
// April 2011


// what to do with incoming data
byte command = 0;

// start of transaction, no command yet
void ss_falling ()
{
  command = 0;
}  // end of interrupt service routine (ISR) ss_falling

void setup (void)
{

  // have to send on master in, *slave out*
  pinMode(MISO, OUTPUT);

  // turn on SPI in slave mode
  SPCR |= _BV(SPE);

  // turn on interrupts
  SPCR |= _BV(SPIE);

  // interrupt for SS falling edge
  attachInterrupt (0, ss_falling, FALLING);
  
}  // end of setup


// SPI interrupt routine
ISR (SPI_STC_vect)
{
  byte c = SPDR;
 
  switch (command)
  {
  // no command? then this is the command
  case 0:
    command = c;
    SPDR = 0;
    break;
    
  // add to incoming byte, return result
  case 'a':
    SPDR = c + 15;  // add 15
    break;
    
  // subtract from incoming byte, return result
  case 's':
    SPDR = c - 8;  // subtract 8
    break;

  } // end of switch

}  // end of interrupt service routine (ISR) SPI_STC_vect


void loop (void)
{
// all done with interrupts
}  // end of loop

- Nick Gammon

www.gammon.com.au, www.mushclient.com
[Go to top] top

Posted by Nick Gammon   Australia  (22,975 posts)  [Biography] bio   Forum Administrator
Date Reply #3 on Thu 12 Apr 2012 04:36 AM (UTC)

Amended on Sat 28 Apr 2012 02:52 AM (UTC) by Nick Gammon

Message
SPI from the USART ... an alternative


The Atmega328 also provides a second SPI hardware port - the USART chip (the one normally used for hardware serial).

If you want another SPI port, and don't need async serial, you can use this. Note that in this mode you can only make an SPI master, not a slave.

The example code below shows sending a message via SPI at 2 MHz clock.


/*
Example of USART in SPI mode on the Atmega328.

Author:   Nick Gammon
Date:     12th April 2012
Version:   1.0

Licence: Released for public use.

Pins: D0 MISO (Rx)
      D1 MOSI (Tx)
      D4 SCK  (clock)
      D5 SS   (slave select)  <-- this can be changed

 Registers of interest:
 
 UDR0 - data register
 
 UCSR0A – USART Control and Status Register A
     Receive Complete, Transmit Complete, USART Data Register Empty
 
 UCSR0B – USART Control and Status Register B
     RX Complete Interrupt Enable, TX Complete Interrupt Enable, Data Register Empty Interrupt Enable ,
     Receiver Enable, Transmitter Enable
   
 UCSR0C – USART Control and Status Register C
     Mode Select (async, sync, SPI), Data Order, Clock Phase, Clock Polarity
 
 UBRR0L and UBRR0H - Baud Rate Registers - together are UBRR0 (16 bit)

*/
 
const byte MSPIM_SCK = 4;
const byte MSPIM_SS = 5;

// sends/receives one byte
byte MSPIMTransfer (byte c)
{
  // wait for transmitter ready
  while ((UCSR0A & _BV (UDRE0)) == 0)
    {}
    
  // send byte
  UDR0 = c;
  
  // wait for receiver ready
  while ((UCSR0A & _BV (RXC0)) == 0)
    {}
    
  // receive byte, return it
  return UDR0;
}  // end of MSPIMTransfer

// select slave, write a string, wait for transfer to complete, deselect slave
void spiWriteString (const char * str)
  {
  if (!str) return;  // Sanity Clause
  
  char c;

  // enable slave select
  digitalWrite (MSPIM_SS, LOW);
  
  // send the string
  while (c = *str++)
    MSPIMTransfer (c);
  
  // wait for all transmissions to finish
  while ((UCSR0A & _BV (TXC0)) == 0)
    {}

  // disable slave select
  digitalWrite (MSPIM_SS, HIGH);
  }  // end of spiWriteString
 
void setup()
  {
  
  pinMode (MSPIM_SS, OUTPUT);   // SS
  
  // must be zero before enabling the transmitter
  UBRR0 = 0;

  UCSR0A = _BV (TXC0);  // any old transmit now complete
  
  pinMode (MSPIM_SCK, OUTPUT);   // set XCK pin as output to enable master mode

  UCSR0C = _BV (UMSEL00) | _BV (UMSEL01);  // Master SPI mode
  UCSR0B = _BV (TXEN0) | _BV (RXEN0);  // transmit enable and receive enable

  // must be done last, see page 206
  UBRR0 = 3;  // 2 Mhz clock rate
  
  }  // end of setup

void loop()
  {
  spiWriteString ("hello, world!");
  }  // end of loop


Results on logic analyzer:


Pins for MSPIM mode


- Nick Gammon

www.gammon.com.au, www.mushclient.com
[Go to top] top

Posted by Nick Gammon   Australia  (22,975 posts)  [Biography] bio   Forum Administrator
Date Reply #4 on Tue 06 Nov 2012 09:50 PM (UTC)

Amended on Tue 06 Nov 2012 09:51 PM (UTC) by Nick Gammon

Message
SPI speeds


The default setting for SPI is to use the system clock speed divided by four, that is, one SPI clock pulse every 250 nS. You can change the clock divider by using setClockDivider like this:


SPI.setClockDivider(divider);


Where "divider" is one of:


  • SPI_CLOCK_DIV2
  • SPI_CLOCK_DIV4
  • SPI_CLOCK_DIV8
  • SPI_CLOCK_DIV16
  • SPI_CLOCK_DIV32
  • SPI_CLOCK_DIV64
  • SPI_CLOCK_DIV128


The fastest rate is "divide by 2" or one SPI clock pulse every 125 nS. This would therefore take 8 * 125 nS or 1 uS to transmit one byte.

However empirical testing shows that it is necessary to have two clock pulses between bytes, so the maximum rate at which bytes can be clocked out is 1.125 uS each (with a clock divider of 2).

To transfer data this fast you can't afford the time taken to check the "completed" register, so a timed loop is better, eg.


#define NOP __asm__ __volatile__ ("nop");
#define WAIT NOP NOP NOP NOP NOP NOP NOP NOP NOP NOP NOP // 11 NOPs 

...

  byte *firstByte = &data [0]; 
  byte *lastByte = &data [100];   // however many bytes we need to send 
     
  digitalWrite (SS, LOW);
  do 
    {       
    SPDR = *firstByte++; 
    WAIT;  // pad out to 18 cycles
    } while (firstByte != lastByte); 
  
  NOP; NOP; NOP; // Wait for last byte to finish transfer. 
  digitalWrite (SS, HIGH);


A loop like the above takes 18 cycles as you can see from the cycles counts in brackets below:


 368:   89 91           ld      r24, Y+   (2)
 36a:   8e bd           out     0x2e, r24       ; 46   (1)
 36c:   00 00           nop   (1)
 36e:   00 00           nop   (1)
 370:   00 00           nop   (1)
 372:   00 00           nop   (1)
 374:   00 00           nop   (1)
 376:   00 00           nop   (1)
 378:   00 00           nop   (1)
 37a:   00 00           nop   (1)
 37c:   00 00           nop   (1)
 37e:   00 00           nop   (1)
 380:   00 00           nop   (1)
 382:   c0 17           cp      r28, r16   (1)
 384:   d1 07           cpc     r29, r17   (1)
 386:   81 f7           brne    .-32            ; 0x368 <loop+0x4c>   (1/2)


That takes 18 cycles if the branch is taken.

To summarize, each byte can be sent at a maximum rate of one per 1.125 uS (with a 16 MHz clock) giving a theoretical maximum transfer rate of 1/1.125 uS, or 888,888 bytes per second (excluding overhead like setting SS low and so on).

This is achievable with both the "normal" SPI hardware and the MSPIM mode described above.

- Nick Gammon

www.gammon.com.au, www.mushclient.com
[Go to top] top

Posted by Nick Gammon   Australia  (22,975 posts)  [Biography] bio   Forum Administrator
Date Reply #5 on Wed 06 Mar 2013 01:29 AM (UTC)

Amended on Sun 27 Oct 2013 03:02 AM (UTC) by Nick Gammon

Message
SPI for ATtiny25 / ATtiny45 / ATtiny85


The small "namespace" below illustrates how you can do SPI on the ATtiny25/45/85 chips.

See further down for the ATtiny24/44/84 version.


// Written by Nick Gammon
// March 2013

// ATMEL ATTINY45 / ARDUINO pin mappings
//
//                         +-\/-+
// RESET  Ain0 (D 5) PB5  1|    |8  Vcc
// CLK1   Ain3 (D 3) PB3  2|    |7  PB2 (D 2) Ain1  SCK  / USCK / SCL
// CLK0   Ain2 (D 4) PB4  3|    |6  PB1 (D 1) pwm1  MISO / DO
//                   GND  4|    |5  PB0 (D 0) pwm0  MOSI / DI / SDA
//                         +----+


namespace tinySPI 
  {

  const byte DI   = 0;  // D0, pin 5  Data In
  const byte DO   = 1;  // D1, pin 6  Data Out (this is *not* MOSI)
  const byte USCK = 2;  // D2, pin 7  Universal Serial Interface clock
  const byte SS   = 3;  // D3, pin 2  Slave Select
  
  void begin ()
    {
    digitalWrite (SS, HIGH);  // ensure SS stays high until needed
    pinMode (USCK, OUTPUT);
    pinMode (DO,   OUTPUT);
    pinMode (SS,   OUTPUT);
    pinMode (DI,   INPUT);
    USICR = bit (USIWM0);  // 3-wire mode
    }  // end of tinySPI_begin
    
  // What is happening here is that the loop executes 16 times.
  // This is because the 4-bit counter in USISR is initially zero, and then
  // toggles 16 times until it overflows, thus counting out 8 bits (16 toggles).
  // The data is valid on the clock leading edge (equivalent to CPHA == 0).
  
  byte transfer (const byte b)
    {
    USIDR = b;  // byte to output
    USISR = bit (USIOIF);  // clear Counter Overflow Interrupt Flag, set count to zero 
    do
      {
      USICR = bit (USIWM0)   // 3-wire mode
            | bit (USICS1) | bit (USICLK)  // Software clock strobe
            | bit (USITC);   // Toggle Clock Port Pin
      } while ((USISR & bit (USIOIF)) == 0);  // until Counter Overflow Interrupt Flag set
      
    return USIDR;  // return read data
    }    // end of tinySPI_transfer

  };  // end of namespace tinySPI


Example code using the above:


void setup (void)
  {
  tinySPI::begin ();
  }  // end of setup

void loop (void)
  {
  char c;
  
  // enable Slave Select
  digitalWrite(tinySPI::SS, LOW); 
  
  // send test string
  for (const char * p = "Hello, world!" ; c = *p; p++)
    tinySPI::transfer (c);

  // disable Slave Select
  digitalWrite(tinySPI::SS, HIGH);

  delay (100); 
  }  // end of loop


You can choose any pin for SS (slave select). You may not even require it. The library uses a tight loop to clock out a byte (and receive the incoming byte). Timing on my logic analyzer gives:


This is around 9 uS for each byte, with a SPI clock speed of 1 MHz.


Faster version


The version below uses the second suggested method in the Atmel datasheet. Rather than looping, the loop is "unwound" to save the overhead of executing a loop 8 times. This improves the speed somewhat.


// Written by Nick Gammon
// March 2013

// ATMEL ATTINY45 / ARDUINO
//
//                         +-\/-+
// RESET  Ain0 (D 5) PB5  1|    |8  Vcc
// CLK1   Ain3 (D 3) PB3  2|    |7  PB2 (D 2) Ain1  SCK  / USCK / SCL
// CLK0   Ain2 (D 4) PB4  3|    |6  PB1 (D 1) pwm1  MISO / DO
//                   GND  4|    |5  PB0 (D 0) pwm0  MOSI / DI / SDA
//                         +----+

namespace tinySPI 
  {
  const byte DI   = 0;  // D0, pin 5  Data In
  const byte DO   = 1;  // D1, pin 6  Data Out (this is *not* MOSI)
  const byte USCK = 2;  // D2, pin 7  Universal Serial Interface clock
  const byte SS   = 3;  // D3, pin 2  Slave Select
  
  void begin ()
    {
    digitalWrite (SS, HIGH);  // ensure SS stays high until needed
    pinMode (USCK, OUTPUT);
    pinMode (DO,   OUTPUT);
    pinMode (SS,   OUTPUT);
    USICR = bit (USIWM0);  // 3-wire mode
    }  // end of tinySPI_begin
    
  // Clock out 8 bits. We write to USICR 16 times, because we need 16
  // toggles of the clock (on/off/on/off etc.) but only 8 shifts.
  // Thus first we clock, then we clock-and-shift.
  // The data is valid on the clock leading edge (equivalent to CPHA == 0).

  const byte toggleClock         = bit (USIWM0) | bit (USICS1) | bit (USITC);
  const byte toggleClockAndShift = bit (USIWM0) | bit (USICS1) | bit (USITC) | bit (USICLK);
  
  byte transfer (const byte b)
    {
    USIDR = b;  // byte to output

    USICR = toggleClock;          // MSB
    USICR = toggleClockAndShift;
    USICR = toggleClock;
    USICR = toggleClockAndShift;
    USICR = toggleClock;
    USICR = toggleClockAndShift;
    USICR = toggleClock;
    USICR = toggleClockAndShift;
    USICR = toggleClock;
    USICR = toggleClockAndShift;
    USICR = toggleClock;
    USICR = toggleClockAndShift;
    USICR = toggleClock;
    USICR = toggleClockAndShift;
    USICR = toggleClock;          // LSB
    USICR = toggleClockAndShift;
      
    return USIDR;  // return read data
    }    // end of tinySPI_transfer

  };  // end of namespace tinySPI 


The logic analyzer shows that the SPI clock speed is now 4 MHz and the time taken to clock out one byte is just over 2 uS.

- Nick Gammon

www.gammon.com.au, www.mushclient.com
[Go to top] top

Posted by Nick Gammon   Australia  (22,975 posts)  [Biography] bio   Forum Administrator
Date Reply #6 on Sun 24 Mar 2013 03:50 AM (UTC)

Amended on Sat 23 Aug 2014 03:59 AM (UTC) by Nick Gammon

Message
Bit-banged SPI


I have written a small library to implement "bit banged" SPI for situations where you might not want to use the hardware SPI. It can be downloaded from:

http://www.gammon.com.au/Arduino/bitBangedSPI.zip

Also at:

https://github.com/nickgammon/bitBangedSPI

Example code:


#include <bitBangedSPI.h>

bitBangedSPI bbSPI (5, 6, 7);  // MOSI, MISO, SCK
const byte mySS =  8;  // slave select

void setup (void)
  {
  bbSPI.begin ();
  pinMode (mySS, OUTPUT);
  }  // end of setup

void loop (void)
  {
  char c;
  
  // enable Slave Select
  digitalWrite(mySS, LOW); 
  
  // send test string
  for (const char * p = "Hello, world!" ; c = *p; p++)
    bbSPI.transfer (c);

  // disable Slave Select
  digitalWrite(mySS, HIGH);

  delay (100); 
  }  // end of loop


The constructor specifies the MOSI, MISO and SCK pins. It is your responsibility to manage "slave select".

Both MOSI and MISO may be bitBangedSPI::NO_PIN, in which case they are not written to/read from, in case you are working with a one-way device (eg. an output shift register).

The library uses digitalRead and digitalWrite so it is not particularly fast, but for situation like reading configuration switches this shouldn't be an issue. Timing shows that it takes around 240 uS to transfer one byte.

Faster bit-banged SPI


The library below uses direct port manipulations to speed up the bit-banged SPI. It is a bit fiddlier to use, because you need to look up the ports/pins/data-direction registers for the appropriate pins. However, it is faster.

Download:

http://www.gammon.com.au/Arduino/bitBangedSPIfast.zip

Example of use:


#include <bitBangedSPIfast.h>

bitBangedSPIfast bbSPI (PORTD,  5, PIND,  6, PORTD, 7,    // MOSI port (D5), MISO pin (D6), SCK port (D7)
                        DDRD,   5, DDRD,  6, DDRD,  7);   // MOSI ddr  (D5), MISO ddr (D6), SCK ddr  (D7)
const byte mySS =  8;  // slave select

void setup (void)
  {
  bbSPI.begin ();
  pinMode (mySS, OUTPUT);
  }  // end of setup

void loop (void)
  {
  char c;
  
  // enable Slave Select
  digitalWrite(mySS, LOW); 
  
  // send test string
  for (const char * p = "Hello, world!" ; c = *p; p++)
    bbSPI.transfer (c);

  // disable Slave Select
  digitalWrite(mySS, HIGH);

  delay (100); 
  }  // end of loop


This takes about 52 uS to transfer one byte.

Both of these are somewhat slower than hardware SPI, but could come in handy where you are using the hardware SPI for other purposes, and just want to draw to an LCD screen, or update some LEDS, where speed is not really of the essence.

- Nick Gammon

www.gammon.com.au, www.mushclient.com
[Go to top] top

Posted by Nick Gammon   Australia  (22,975 posts)  [Biography] bio   Forum Administrator
Date Reply #7 on Sun 27 Oct 2013 03:00 AM (UTC)

Amended on Sun 27 Oct 2013 03:07 AM (UTC) by Nick Gammon

Message
SPI for ATtiny24 / ATtiny44 / ATtiny84


The small "namespace" below illustrates how you can do SPI on the ATtiny24/44/84 chips.

See further up for the ATtiny25/45/85 version.


// Written by Nick Gammon
// October 2013

// ATMEL ATTINY84 / ARDUINO
//
//                      +-\/-+
//                VCC  1|    |14  GND
//        (D 10)  PB0  2|    |13  AREF (D  0)
//        (D  9)  PB1  3|    |12  PA1  (D  1) 
//                PB3  4|    |11  PA2  (D  2) 
//  INT0  (D  8)  PB2  5|    |10  PA3  (D  3) 
//        (D  7)  PA7  6|    |9   PA4  (D  4)   SCK
//  MOSI  (D  6)  PA6  7|    |8   PA5  (D  5)   MISO    
//                      +----+

namespace tinySPI 
  {

  const byte DI   = 6;  // D6, pin 7  Data In  (MOSI)
  const byte DO   = 5;  // D5, pin 8  Data Out (MISO) 
  const byte USCK = 4;  // D4, pin 9  Universal Serial Interface clock
  const byte SS   = 3;  // D3, pin 10 Slave Select
  
  void begin ()
    {
    digitalWrite (SS, HIGH);  // ensure SS stays high until needed
    pinMode (USCK, OUTPUT);
    pinMode (DO,   OUTPUT);
    pinMode (SS,   OUTPUT);
    pinMode (DI,   INPUT);
    USICR = bit (USIWM0);  // 3-wire mode
    }  // end of tinySPI_begin
    
  // What is happening here is that the loop executes 16 times.
  // This is because the 4-bit counter in USISR is initially zero, and then
  // toggles 16 times until it overflows, thus counting out 8 bits (16 toggles).
  // The data is valid on the clock leading edge (equivalent to CPHA == 0).
  
  byte transfer (const byte b)
    {
    USIDR = b;  // byte to output
    USISR = bit (USIOIF);  // clear Counter Overflow Interrupt Flag, set count to zero 
    do
      {
      USICR = bit (USIWM0)   // 3-wire mode
            | bit (USICS1) | bit (USICLK)  // Software clock strobe
            | bit (USITC);   // Toggle Clock Port Pin
      } while ((USISR & bit (USIOIF)) == 0);  // until Counter Overflow Interrupt Flag set
      
    return USIDR;  // return read data
    }    // end of tinySPI_transfer

  };  // end of namespace tinySPI


Example code using the above:


void setup (void)
  {
  tinySPI::begin ();
  }  // end of setup

void loop (void)
  {
  char c;
  
  // enable Slave Select
  digitalWrite(tinySPI::SS, LOW); 
  
  // send test string
  for (const char * p = "Hello, world!" ; c = *p; p++)
    tinySPI::transfer (c);

  // disable Slave Select
  digitalWrite(tinySPI::SS, HIGH);

  delay (100); 
  }  // end of loop


You can choose any pin for SS (slave select). You may not even require it. The library uses a tight loop to clock out a byte (and receive the incoming byte). Timing on my logic analyzer was similar to the code in the earlier post for the Attiny85.

This is around 9 uS for each byte, with a SPI clock speed of 1 MHz.


Faster version


The version below uses the second suggested method in the Atmel datasheet. Rather than looping, the loop is "unwound" to save the overhead of executing a loop 8 times. This improves the speed somewhat.


// Written by Nick Gammon
// October 2013

// ATMEL ATTINY84 / ARDUINO
//
//                      +-\/-+
//                VCC  1|    |14  GND
//        (D 10)  PB0  2|    |13  AREF (D  0)
//        (D  9)  PB1  3|    |12  PA1  (D  1) 
//                PB3  4|    |11  PA2  (D  2) 
//  INT0  (D  8)  PB2  5|    |10  PA3  (D  3)   
//        (D  7)  PA7  6|    |9   PA4  (D  4)   SCK
//  MOSI  (D  6)  PA6  7|    |8   PA5  (D  5)   MISO    
//                      +----+

namespace tinySPI 
  {

  const byte DI   = 6;  // D6, pin 7  Data In  (MOSI)
  const byte DO   = 5;  // D5, pin 8  Data Out (MISO) 
  const byte USCK = 4;  // D4, pin 9  Universal Serial Interface clock
  const byte SS   = 3;  // D3, pin 10 Slave Select
  
  void begin ()
    {
    digitalWrite (SS, HIGH);  // ensure SS stays high until needed
    pinMode (USCK, OUTPUT);
    pinMode (DO,   OUTPUT);
    pinMode (SS,   OUTPUT);
    pinMode (DI,   INPUT);
    USICR = bit (USIWM0);  // 3-wire mode
    }  // end of tinySPI_begin
    
  // Clock out 8 bits. We write to USICR 16 times, because we need 16
  // toggles of the clock (on/off/on/off etc.) but only 8 shifts.
  // Thus first we clock, then we clock-and-shift.
  // The data is valid on the clock leading edge (equivalent to CPHA == 0).

  const byte toggleClock         = bit (USIWM0) | bit (USICS1) | bit (USITC);
  const byte toggleClockAndShift = bit (USIWM0) | bit (USICS1) | bit (USITC) | bit (USICLK);
  
  byte transfer (const byte b)
    {
    USIDR = b;  // byte to output

    USICR = toggleClock;          // MSB
    USICR = toggleClockAndShift;
    USICR = toggleClock;
    USICR = toggleClockAndShift;
    USICR = toggleClock;
    USICR = toggleClockAndShift;
    USICR = toggleClock;
    USICR = toggleClockAndShift;
    USICR = toggleClock;
    USICR = toggleClockAndShift;
    USICR = toggleClock;
    USICR = toggleClockAndShift;
    USICR = toggleClock;
    USICR = toggleClockAndShift;
    USICR = toggleClock;          // LSB
    USICR = toggleClockAndShift;
      
    return USIDR;  // return read data
    }    // end of tinySPI_transfer

  };  // end of namespace tinySPI


The logic analyzer shows that the SPI clock speed is now 4 MHz and the time taken to clock out one byte is just over 2 uS.


Jack Christensen from the Arduino forum has made a library for the ATtiny24/44/84 and ATtiny25/45/85 range here:

https://github.com/JChristensen/tinySPI

- Nick Gammon

www.gammon.com.au, www.mushclient.com
[Go to top] top

Posted by Nick Gammon   Australia  (22,975 posts)  [Biography] bio   Forum Administrator
Date Reply #8 on Tue 07 Oct 2014 10:01 PM (UTC)

Amended on Tue 07 Oct 2014 10:04 PM (UTC) by Nick Gammon

Message
Send and receive any data type


So far we have described just sending individual bytes (or strings). If we want to send or receive a structure (eg. some integers and floats) we can use something similar to the I2C_anything library described here:

http://www.gammon.com.au/forum/?id=10896&reply=8#reply8

We can make a library (SPI_anything) which basically consists of this file:

SPI_anything.h :


#include <Arduino.h>

template <typename T> unsigned int SPI_writeAnything (const T& value)
  {
    const byte * p = (const byte*) &value;
    unsigned int i;
    for (i = 0; i < sizeof value; i++)
          SPI.transfer(*p++);
    return i;
  }  // end of SPI_writeAnything

template <typename T> unsigned int SPI_readAnything(T& value)
  {
    byte * p = (byte*) &value;
    unsigned int i;
    for (i = 0; i < sizeof value; i++)
          *p++ = SPI.transfer (0);
    return i;
  }  // end of SPI_readAnything
  
  
template <typename T> unsigned int SPI_readAnything_ISR(T& value)
  {
    byte * p = (byte*) &value;
    unsigned int i;
    *p++ = SPDR;  // get first byte
    for (i = 1; i < sizeof value; i++)
          *p++ = SPI.transfer (0);
    return i;
  }  // end of SPI_readAnything_ISR  


It uses templates to convert any data type into a stream of bytes. For example, to send a structure to another Arduino ...

Master


// master

#include <SPI.h>
#include "SPI_anything.h"

// create a structure to store the different data values:
typedef struct myStruct
{
  byte a;
  int b;
  long c;
};

myStruct foo;

void setup ()
  {
  SPI.begin ();
  // Slow down the master a bit
  SPI.setClockDivider(SPI_CLOCK_DIV8);

  foo.a = 42;
  foo.b = 32000;
  foo.c = 100000;
  }  // end of setup

void loop () 
  { 
  digitalWrite(SS, LOW);    // SS is pin 10
  SPI_writeAnything (foo);
  digitalWrite(SS, HIGH);
  delay (1000);  // for testing  
  
  foo.c++;
  }  // end of loop


Now to receive that structure. First, a version which does not use interrupts:

Slave


// slave

#include <SPI.h>
#include "SPI_anything.h"

// create a structure to store the different data values:
typedef struct myStruct
{
  byte a;
  int b;
  long c;
};

myStruct foo;

void setup ()
  {
  Serial.begin (115200);   // debugging

  // have to send on master in, *slave out*
  pinMode(MISO, OUTPUT);
  
  // turn on SPI in slave mode
  SPCR |= _BV(SPE);
  }  // end of setup

void loop () 
  { 
  SPI_readAnything (foo);
  Serial.println ((int) foo.a);
  Serial.println (foo.b);
  Serial.println (foo.c);
  Serial.println ();
  }  // end of loop


This just waits inside "loop" for data to arrive. But if you want to do something else you would want to use a SPI receive interrupt:


// slave

#include <SPI.h>
#include "SPI_anything.h"

// create a structure to store the different data values:
typedef struct myStruct
{
  byte a;
  int b;
  long c;
};

volatile myStruct foo;
volatile bool haveData = false;

void setup ()
  {
  Serial.begin (115200);   // debugging

  // have to send on master in, *slave out*
  pinMode(MISO, OUTPUT);
  
  // turn on SPI in slave mode
  SPCR |= _BV(SPE);

  // now turn on interrupts
  SPI.attachInterrupt();
  
  }  // end of setup

void loop () 
  { 
  if (haveData)
     {
     Serial.println ((int) foo.a);
     Serial.println (foo.b);
     Serial.println (foo.c);
     Serial.println ();
     haveData = false;
     }
  }  // end of loop

// SPI interrupt routine
ISR (SPI_STC_vect)
  {
  SPI_readAnything_ISR (foo);
  haveData = true;
  }  // end of interrupt routine SPI_STC_vect


This is slightly trickier, because when the interrupt fires we already have the first byte. So we need to use a different version designed to go into an ISR (SPI_readAnything_ISR). That function retrieves the first byte (which caused the interrupt) and then waits for the remaining ones.


Output:


42
32000
101060

42
32000
101063

42
32000
101064

42
32000
101065

42
32000
101066

42
32000
101067

- Nick Gammon

www.gammon.com.au, www.mushclient.com
[Go to top] top

Posted by Nick Gammon   Australia  (22,975 posts)  [Biography] bio   Forum Administrator
Date Reply #9 on Sun 22 Feb 2015 09:48 PM (UTC)

Amended on Wed 23 Sep 2015 09:44 PM (UTC) by Nick Gammon

Message
SPI under IDE 1.6.0 and later


The Arduino IDE (Integrated Development Environment) has implemented some changes in SPI starting in version 1.6.0.

SPI.begin()


This functions similarly to before, except that it now has a "reference count", so that if you do multiple SPI.begin() calls in a row only the first one does anything useful.

SPI.end()


This functions similarly to before, except that it now decrements the "reference count", and only turns SPI mode off if the reference count is zero. That is, if no-one is using SPI any more.

SPI.usingInterrupt(interruptNumber)


If SPI is used from within an interrupt, this function registers that interrupt with the SPI library, so beginTransaction() can prevent conflicts. The input interruptNumber is the number used with attachInterrupt. If SPI is used from a different interrupt (eg, a timer), interruptNumber should be 255.

Note: the usingInterrupt and notUsingInterrupt functions should not to be called from ISR context or inside a transaction.

SPI.notUsingInterrupt(interruptNumber)


Indicates that we are no longer using this particular external interrupt number.

Note: the usingInterrupt and notUsingInterrupt functions should not to be called from ISR context or inside a transaction.

Deprecated functions


The following functions are now merged into SPI.beginTransaction():


  • SPI.setBitOrder()
  • SPI.setDataMode()
  • SPI.setClockDivider()


These functions should not be used because SPI is waiting on the interrupt bit to be set in the hardware register:


  • SPI.attachInterrupt() // do not use
  • SPI.detachInterrupt() // do not use


SPI.beginTransaction(SPISettings(clockSpeed, dataOrder, dataMode))


Begin using the SPI bus. Normally this is called before asserting the chip select signal.

SPI is configured to use the clock, data order (MSBFIRST or LSBFIRST) and data mode (SPI_MODE0, SPI_MODE1, SPI_MODE2, or SPI_MODE3). The clock speed should be the maximum speed the SPI slave device can accept.

Effectively this does what SPI.setBitOrder(), SPI.setDataMode() and SPI.setClockDivider() used to do, in a single function call. Also SPI.beginTransaction() masks interrupts on the registered interrupt number(s) set by usingInterrupt() above. So for example:


SPI.usingInterrupt (0);  // I am using external interrupt 0
SPI.usingInterrupt (1);  // I am also using external interrupt 1
SPI.beginTransaction (SPISettings (2000000, MSBFIRST, SPI_MODE0));  // 2 MHz clock
digitalWrite (SS, LOW);        // assert Slave Select
byte foo = SPI.transfer (42);  // do a transfer
digitalWrite (SS, HIGH);       // de-assert Slave Select
SPI.endTransaction ();   // allow external interrupts to fire now


During the transaction above, external interrupts 0 and 1 are temporarily disabled.

SPI.transfer(byte data)


Transfers one byte (same as before), receiving a byte from the slave at the same time.

SPI.transfer16(unsigned int data)


Transfers two bytes (unsigned int), receiving two bytes from the slave at the same time. Returns unsigned int. The most significant byte is transferred first.

SPI.transfer(void *buf, size_t count)


Sends multiple (count) bytes to the slave. Returns nothing. Useful for things like LED strips where you do not expect a response.

SPI.endTransaction()


Call this to restore any external interrupts temporarily masked out during the above transaction. Before calling this, de-assert the appropriate chip select (SS) pin for the SPI slave.

Backwards compatibility


You can test for the new functionality by checking for the define SPI_HAS_TRANSACTION. For example:


#if SPI_HAS_TRANSACTION
  SPI.usingInterrupt (0);  // I am using external interrupt 0
  SPI.usingInterrupt (1);  // I am also using external interrupt 1
  SPI.beginTransaction (SPISettings (2000000, MSBFIRST, SPI_MODE0));  // 2 MHz clock
#else
  SPI.setClockDivider(SPI_CLOCK_DIV8);
  SPI.setBitOrder(MSBFIRST);
  SPI.setDataMode(SPI_MODE0);
#endif // SPI_HAS_TRANSACTION

digitalWrite (SS, LOW);        // assert Slave Select
byte foo = SPI.transfer (42);  // do a transfer
digitalWrite (SS, HIGH);       // de-assert Slave Select

#if SPI_HAS_TRANSACTION
  SPI.endTransaction ();   // allow external interrupts to fire now
#endif // SPI_HAS_TRANSACTION


Thanks to documentation from http://www.pjrc.com/teensy/td_libs_SPI.html

- Nick Gammon

www.gammon.com.au, www.mushclient.com
[Go to top] top

The dates and times for posts above are shown in Universal Co-ordinated Time (UTC).

To show them in your local time you can join the forum, and then set the 'time correction' field in your profile to the number of hours difference between your location and UTC time.


446,231 views.

Postings by administrators only.

[Refresh] Refresh page

Go to topic:           Search the forum


[Go to top] top

Quick links: MUSHclient. MUSHclient help. Forum shortcuts. Posting templates. Lua modules. Lua documentation.

Information and images on this site are licensed under the Creative Commons Attribution 3.0 Australia License unless stated otherwise.

[Home]


Written by Nick Gammon - 5K   profile for Nick Gammon on Stack Exchange, a network of free, community-driven Q&A sites   Marriage equality

Comments to: Gammon Software support
[RH click to get RSS URL] Forum RSS feed ( https://gammon.com.au/rss/forum.xml )

[Best viewed with any browser - 2K]    [Hosted at HostDash]